Module 010: Advanced Combinational Logic
Module 010: Advanced Combinational Logic
So far, we’ve used assign to build combinational logic. That works great for simple expressions, but as soon as you want more complicated conditional statements (if, else, case), you’ll need another construct: the always @(*) block.
The always @(*) Block
The assign statement is great for simple connections, but as soon as you want to describe more complex logic (like multiple conditions), assign quickly becomes messy.
That’s where the always @(*) block comes in.
- It is used to describe combinational logic.
- The
(*)means “whenever any input changes, reevaluate all statements inside the block.”
Note that any assignments done inside the always block must have a datatype reg instead of wire. As the module input and output ports are, by default, wires, adding a modifier reg will allow the port name to be assigned inside the always block. This can be seen in the example below.
Example: Rewriting Assign with Always
module and_gate_assign(
    input a,
    input b,
    output y
);
    assign y = a & b; // As covered in Module 0x1, assign statements create combinational logic behavior
endmodule

module and_gate_always(
    input a,
    input b,
    output reg y       // Note how we added a reg modifier to y, since it will be assigned inside the always block
);    // You can also declare the same port as a reg here. Already commented since it was modified in the port declaration earlier.    // reg y;
    always @(*) begin // A good practice is to use begin...end statements to mark the start and end of the declaration
        y = a & b;    // No need to use the assign keyword if we are inside the always block.
    end
endmodule
Both modules, and_gate_assign and and_gate_always, describe the same hardware.
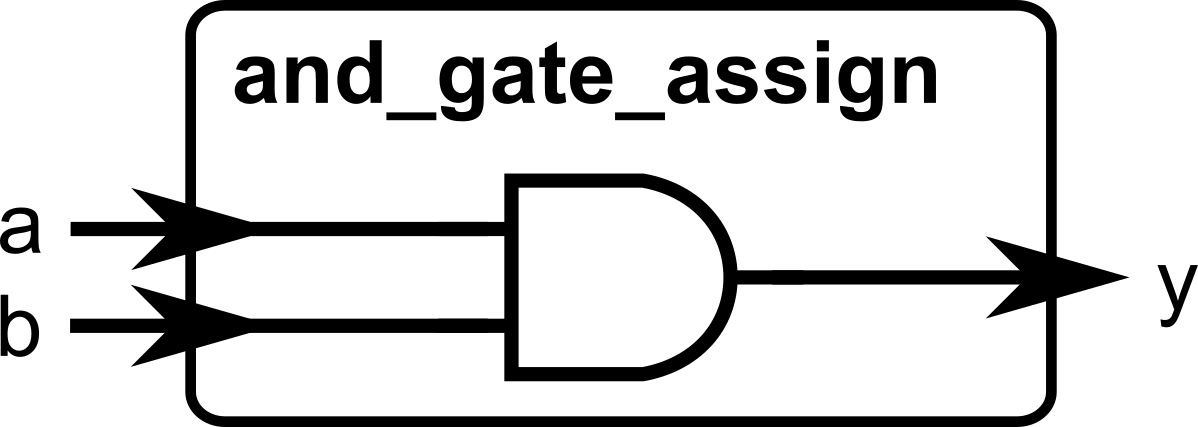
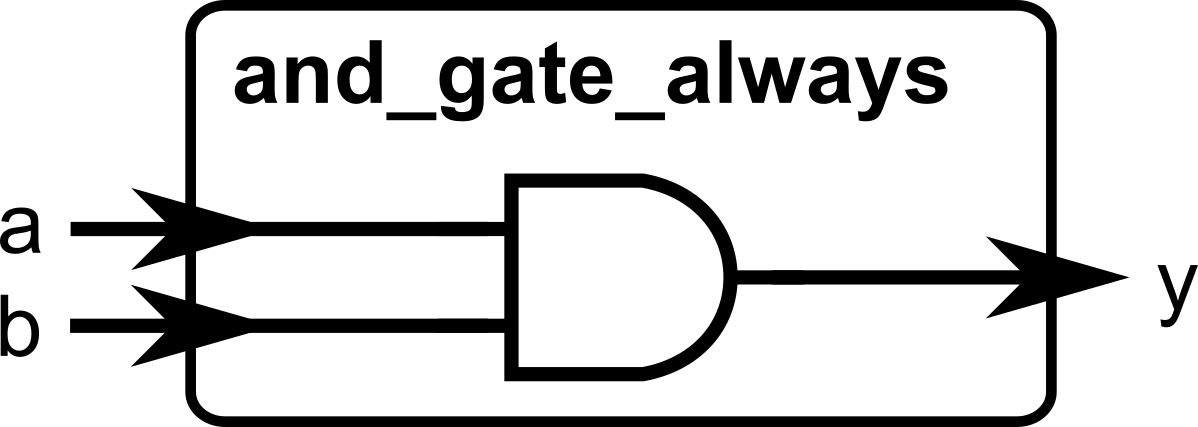
The difference:
assign→ simpler, best for single expressions (typically one-liner expressions).always @(*)→ more flexible, lets us use more complicated (and hierarchical) conditional logic. Again, the port being assigned must be declared as areg, if it is assigned inside thealwaysblock.
Concurrency Reminder
Just like with assign, all always @(*) blocks run at the same time.
Example:
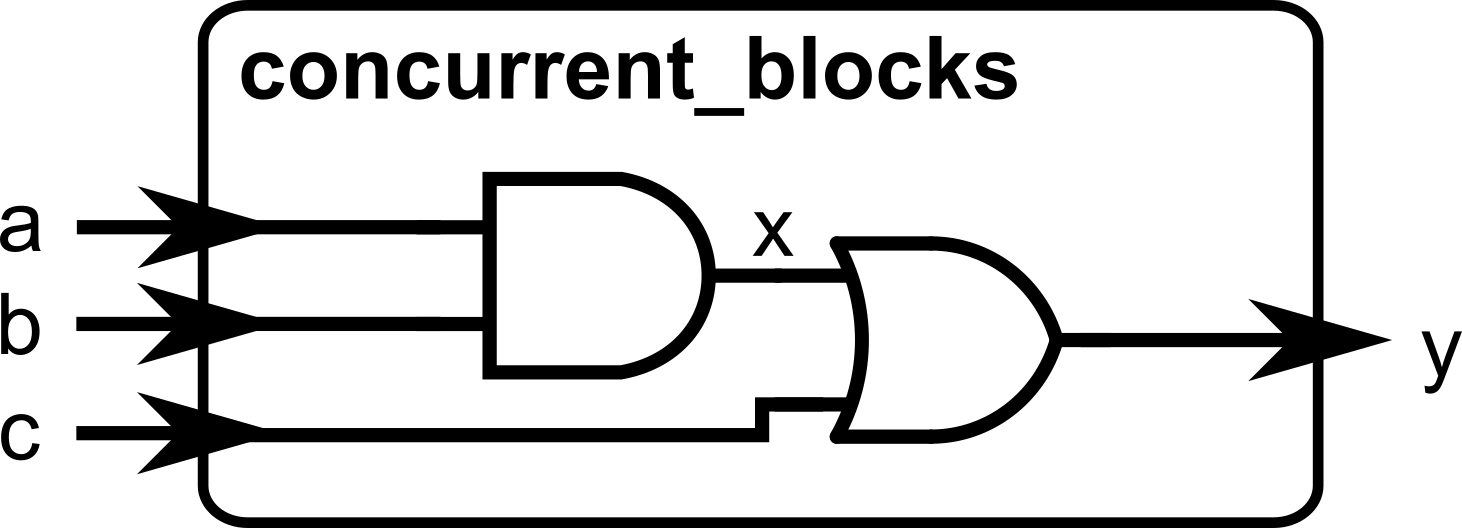
Even though y depends on x, the hardware works fine regardless of the order these lines of code appear. Both blocks are continuously active as we are describing hardware.
You can also declare two separate always blocks. Of course, those two blocks are also concurrently operating with each other.
Example:
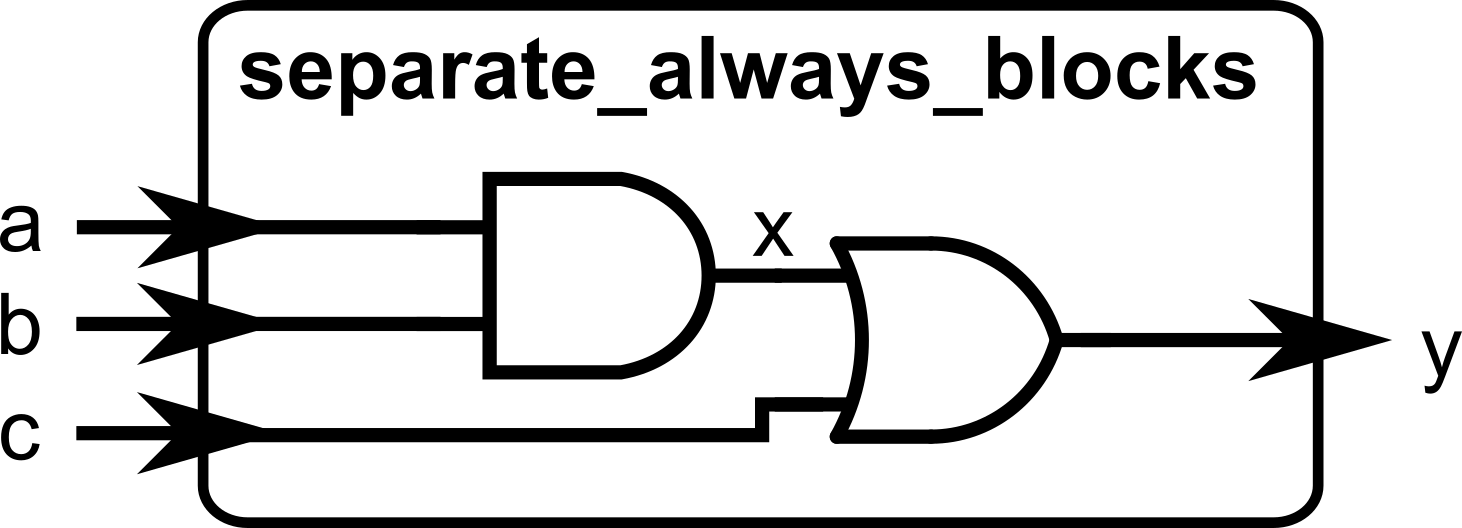
Again, just like earlier, the order of these always@(*) blocks does not matter in the order of evaluation. We are describing hardware and the interconnection of different wires.Conditional logic for always@(*) blocks
The main benefit of using always@(*) blocks is that we can use the if-else and case-endcase constructs inside, which are similar to programming languages. The previous module described a multiplexer using only ternary (condition) ? (true) : (false) operations. While this is fine for single-level selection, it becomes harder to read if we want to have hierarchical conditional statements (e.g., nested if-else statements)
The if-else Statement
Inside always @(*)blocks, you can use if-else just like in programming.
Example: 2-to-1 Multiplexer
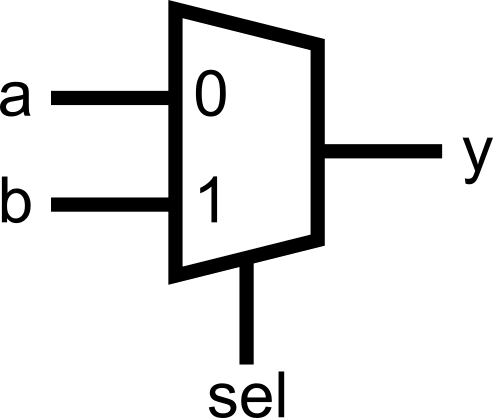
This describes the same as:
The case-endcase Statement
For larger choices, case-endcase is clearer than chaining if-else.
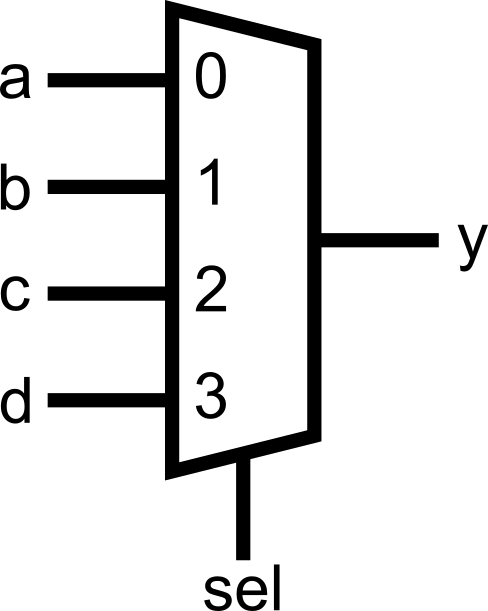
Example: 4-to-1 Multiplexer
module mux_case(
    input [1:0] sel,
    input a, b, c, d,
    output reg y            // output y must be declared as reg to be used inside the always block
);
    always @(*) begin
        case (sel)
            2'b00: begin    // Note: if there are multiple assignments per case, put a begin...end enclosure               y = a;             end
            2'b01: y = b;   // If there is only a single assignment to be evaluated, you can opt not to enclose with begin...end
            2'b10: y = c;
            2'b11: y = d;
        endcase
    end
endmodule
Compare with the equivalent if-else chain:
always @(*) begin
    if (sel == 2'b00) begin           // Note: if there are multiple assignments per case, put a begin...end enclosure
        y = a;
    end else if (sel == 2'b01)        // If there is only a single assignment to be evaluated, you can opt not to enclose with begin...end
        y = b;
    else if (sel == 2'b10)
        y = c;
    else
y = d;endBoth if-else and case-endcase variants would map to the same hardware. Whichever you use is a matter of readability.
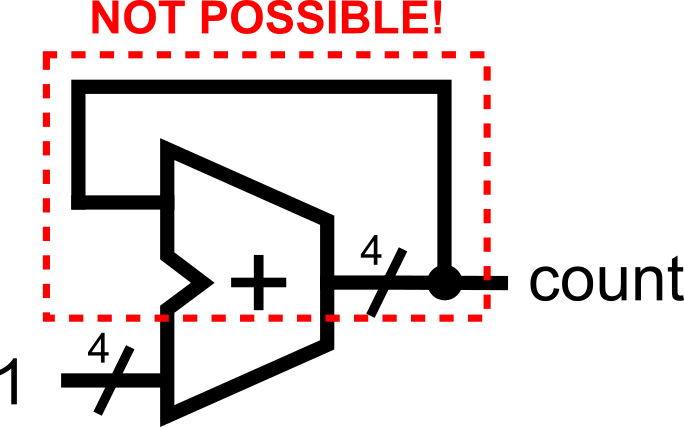
Avoid combinational loops
Avoid creating combinational loops (signals feeding back through purely combinational logic), because they can oscillate, produce unknown X values in simulation, and confuse synthesis/timing tools, often leading to unstable hardware. The assignment where the output depends on the same signal, such as count = count + 1;should notbe done in the combinational logic domain (when using always@(*)), as this would infer a combinational loop, which is not realizable in hardware.
Common Pitfalls
Now that you’re writing combinational logic, there are two major mistakes beginners make.
Inferred Latches (Dangerous)
In combinational logic, every output must have a defined value for all input conditions. If you forget a case, the tool will try to “remember” the old value → it creates a latch (unintended memory element).
The fix: always cover all cases.

Or add a default in a case:
Inferred latches might be fine for sequential logic (more about this in the next module), as memory that holds the previous value can be safely inferred using flip-flops. However, in the combinational logic domain, there is no place for memory. Therefore, the rule of thumb is to always fully cover all possible cases when assigning signals for combinational logic. This can be done either through the else statement for if-else constructs, or the default statement for case-endcase constructs.
Double Drivers (Illegal)
If you drive the same signal in two places, the resulting hardware equivalent can be unpredictable.
The simulation tool may or may not warn you about double driver issues. Sometimes, it will just consider the last assignment done on the signal towards the end of the file. Sometimes, it will consider the assignment that will lead to a simpler hardware implementation. Therefore, avoid double drivers as much as possible!
Example:
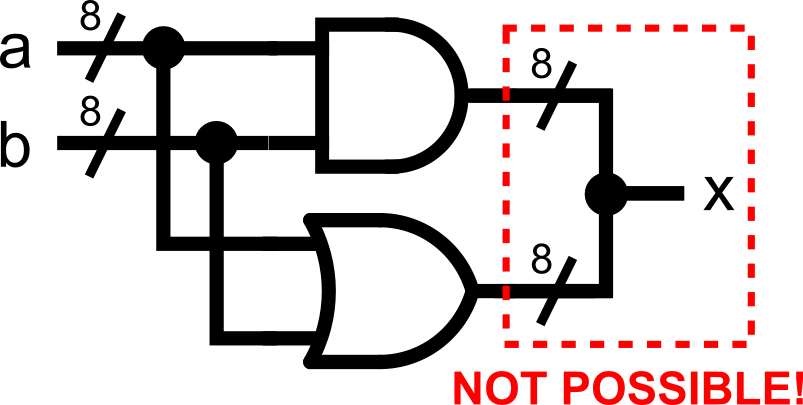
Always remember the simple rule: A signal should only be assigned in one assign OR one always block, never both.
Double driver issues can happen in different ways, particularly when writing the code in a programming mindset. Consider the following example.
// Problematic: conditional overwrites inside one always block
module conditional_overwrite_example (
    input  [7:0] a, b,
    input  use_and,
    input  use_or,
    output reg  [7:0] x
);
    always @(*) begin
        x = 8'h00;                // 'default' value?

        if (use_and) x = a & b;   // write #1 (may execute if use_and = 1)
        if (use_or)  x = a | b;   // write #2 (may also execute if use_or = 1)
    end
endmodule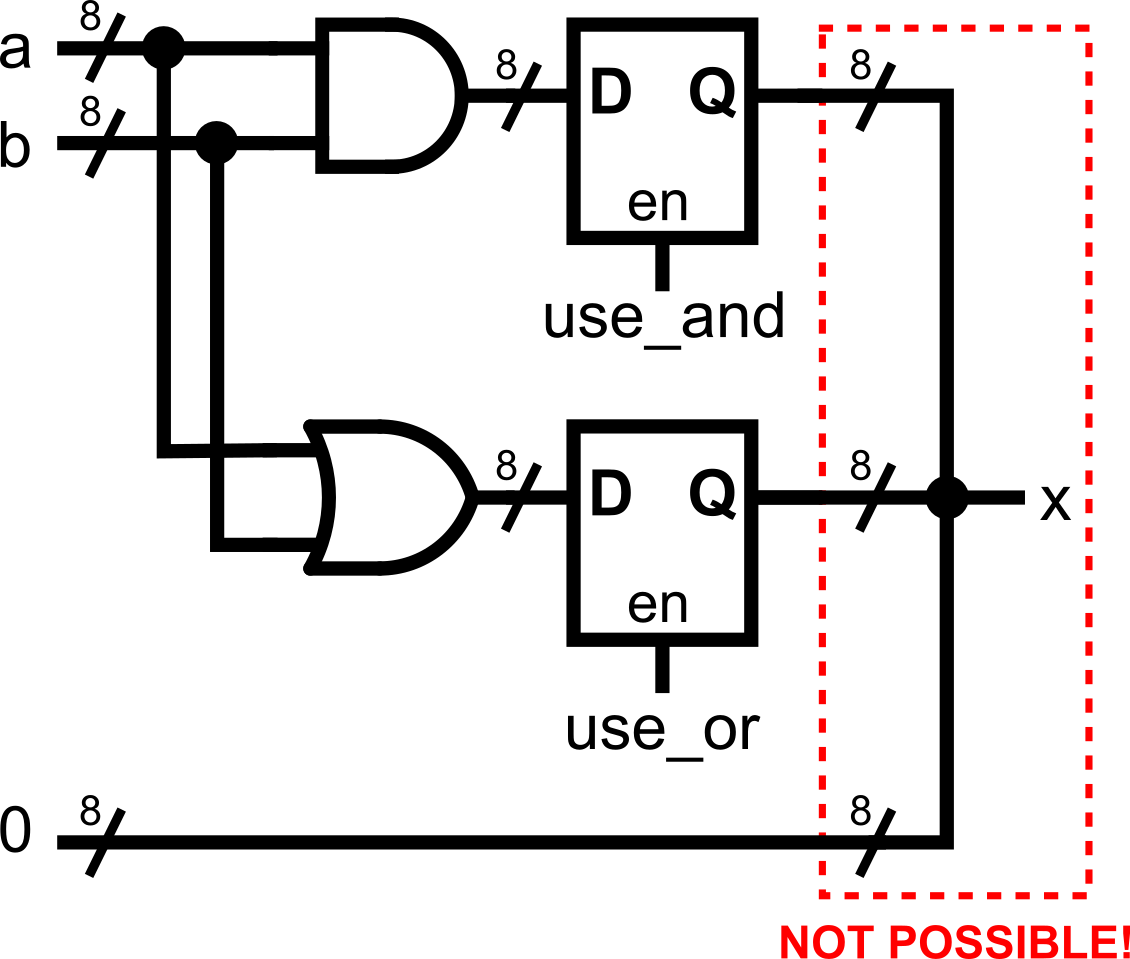
There are a bunch of double-driver problems in this code. While it may look fine in a programming mindset (where every line is sequentially executing), this is problematic if we’re thinking in the hardware domain.
- The assignment x = 8’h00 that is not inside any conditional statement is problematic since it basically says “No matter what happens, x is fixed to 8’h00”.
- The assignment if (use_and) x = a & b; assigns x to something else if the condition is met. However, remember that the previous statement says that x is always fixed to 8’h00. What happens now? Double driver issue!
- The assignment if (use_or) x = a | b; assigns x to another thing if a separate, non-related condition is met. As with the previous one, this conflicts with the 8’h00 assignment earlier. Moreover, what happens if use_and and use_or both become 1? That’s another double driver issue!
A better solution is to think about mutual exclusivity. All assignments to the same signal must always be mutually exclusive! A fixed version of the previous code that guarantees mutual exclusivity (with explicit priority) is shown below.
    always @(*) begin
        if (use_and) x = a & b;        // write #1 (will execute if use_and = 1)
        else if (use_or)  x = a | b;   // write #2 (will execute if use_and = 0 and use_or = 1)        else x = 8'h00;                // 'default' value (will execute if use_and = use_or = 0)
    end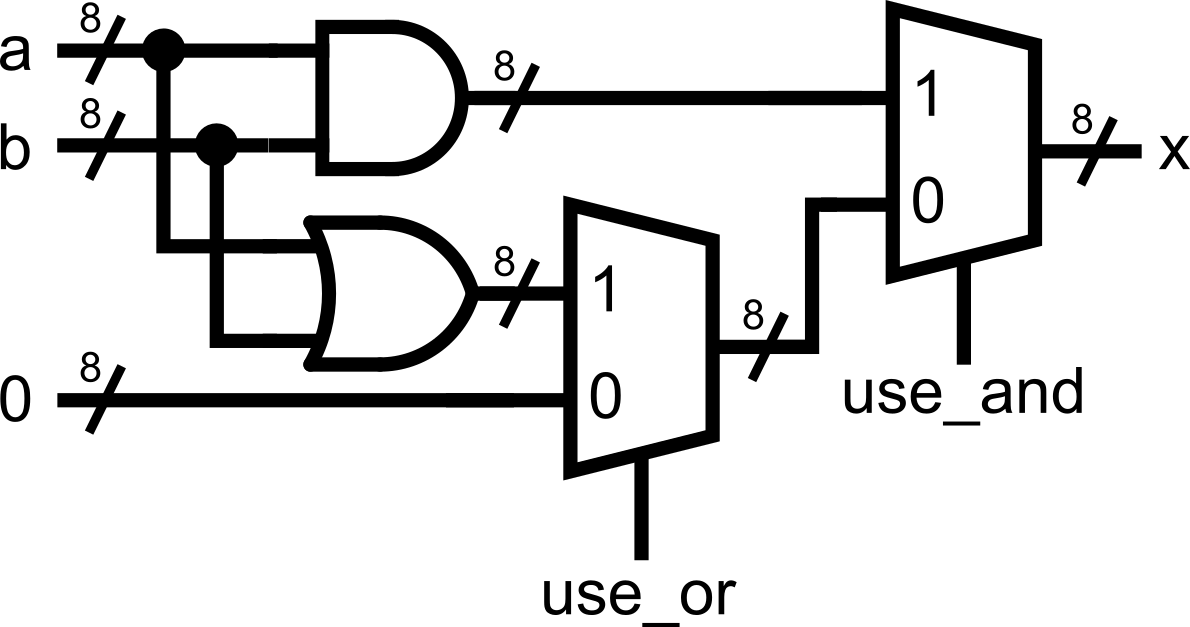
Putting It All Together
Here’s a complete example demonstrating a simple arithmetic and logic unit (ALU), combining everything you have learned so far:
module alu_demo_conditional (
    input  [7:0] a,
    input  [7:0] b,
    input  [2:0] op,             // 3-bit operation selector = 8 possible choices
    output reg [7:0] y           // 8-bit ALU output (must be declared as a reg type now!)
);

    // -----------------------------
    // Creating a large multiplexer using nested if-else and case-endcase statements
    // -----------------------------
    always@(*) begin      if(op[2]) begin            // Check if op[2] (the MSB of 3-bit op) is 1         case(op[1:0])           // Using the lower 2 bits of op, select the corresponding arithmetic/logic operation            2'b00: y = a + b;            2'b01: y = a - b;
            2'b10: y = a & b;
            2'b11: y = a | b;    // can also use 'default:', but every value of op[1:0] is already fully covered
         endcase      end else begin             // If op[2] (the MSB of 3-bit op) is 0, do the following         case(op[1:0])           // Using the lower 2 bits of op, select the corresponding shift operation            2'b00: y = a << 1;            2'b01: y = b << 1;
            2'b10: y = a >> 1;
            2'b11: y = b >> 1;    // can also use 'default:', but every value of op[1:0] is already fully covered         endcase      end    end
endmodule.png)
Just like in programming, you can create nests of conditional logic. You can even combine if-else and case-endcase statements if you prefer. But remember to always aim for code readability.
You can flatten nested if-else chains by combining guards with logical operators (e.g., if (en && (mode==ADD) && (a>b)) ... instead of if(en) if(mode==ADD) if(a>b) ...), which reduces indentation and nesting of conditional statements, but can hurt code readability as expressions grow.
Note how we avoided the common pitfalls. All assignments to y are mutually exclusive (no double driver issues), covering all possible values of the 3-bit op signal (no inferred latch problems).
By the end of this module, you should understand:
- How
always @(*)is a more flexible alternative toassign - Using
if-elseandcase-endcasefor conditional combinational logic - Pitfalls: double drivers and inferred latches, and how to avoid them
Module Activity : The Reg ALU
This module’s activity is in this Jupyter Notebook. Line by line, you can execute the code in order to see how the environment works. I recommend pressing the Run all button at the top and giving it about 2 minutes to download all of the requirements. In the middle of the notebook, you’ll find a section where you need to fill in some verilog code. Time to show your stuff.
Again, we’re implementing an ALU. I promise this is the last time. However, we have another twist this time. This time, you will have to implement the ALU with the outputs defined as reg! The reg statement is, in fact, incompatible with assign statements. Hence, you’ll have to use an always block.
Good luck!