Module 111: Best Practices and Wrap-Up
Module 111: Best Coding Practices and Wrap-up
We’re at the end of this crash course. Let’s summarize what we have covered so far. This module distills the habits that keep your “algorithm → single always @(posedge clk) block” designs readable, predictable, and bug-resistant: clear names, the golden assignment rule, reset priority, width discipline, no double drivers, and keeping simulation-only tricks in the testbench. Think of these as the guardrails that let you prototype fast without stepping on classic HDL landmines like accidental latches, off-by-one flags, or hidden truncations. We’ll illustrate each rule with small, descriptive examples and call out the pitfalls they prevent, so your first-pass hardware works more like your mental model, with fewer surprises later.
1) Use clear, descriptive names (ports, regs, states)
Good names make your algorithm read like a story. Prefer full words, consistent casing/underscores, and localparam state names instead of raw binaries.
❌Bad:
✅Better:
2) The golden assignment rule
Inside
always @(posedge clk): use<=.Inside
always @(*): use=.This keeps your mental model aligned with concurrency and avoids subtle timing bugs. No need to dive into semantics here, just stick to the rule.
✅Example (sequential):
✅Example (combinational):
Don’t ever mix assignments. Always follow the golden rule. One more time for emphasis:
- Inside
always @(posedge clk): use<=. - Inside
always @(*): use=.
3) Remember: hardware is concurrent
Assignments scheduled on the same clock edge update together. Order in the source doesn’t create a sequence; the clock does. This is true across modules and across separate always blocks.
Swap example (both update on the same edge):
That will have the same hardware as this:
.png)
The order of the statements inside the block does not change the hardware. Each line creates a register, and all registers are updated together on the clock edge.
Key Points
- Every assignment in an
always@(posedge clk)block infers a register. Each<=line creates a storage element that holds its value until the next clock edge. - All registers check inputs at the same time. That’s why it’s the old values that get used for every assignment.
- All updates happen together. No one register updates “before” another; they all change in lockstep with the clock.
4) Reset cleanly (and at the top of the priority chain)
- Use a reset to force known start values (don’t rely on declaration-time initializations).
- Always put reset at the top of the
if-elsehierarchy, so it takes the highest priority. It must contain only the reset logic, with no additional logic included.This makes reset dominant and prevents any peer logic at the top level.
- Either synchronous or asynchronous is fine; be consistent in a project.
Synchronous Reset
Asynchronous Reset

5) Be precise with widths
Size your constants and watch truncation/extension. Prefer explicit slices when truncating.
6) Avoid combinational loops
Avoid creating combinational loops (signals feeding back through purely combinational logic), because they can oscillate, produce unknown X values in simulation, and confuse synthesis/timing tools, often leading to unstable hardware. The assignment where the output depends on the same signal, such as count = count + 1;should notbe done in the combinational logic domain (when using always@(*)), as this would infer a combinational loop, which is not realizable in hardware.
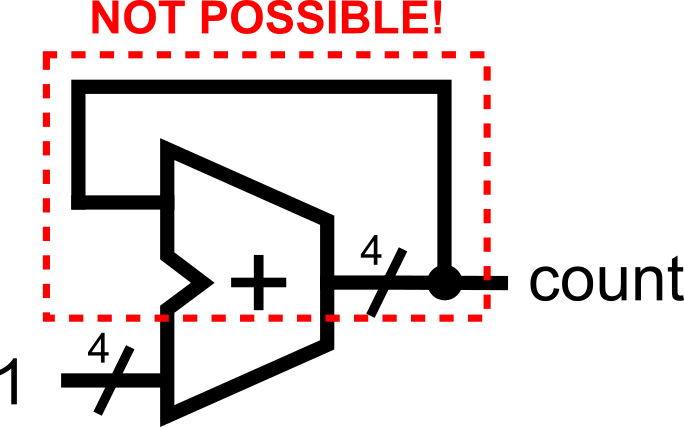
If you truly need feedback, break the loop with a register (use a clocked always @(posedge clk) stage) or restructure the logic into a well-defined sequential design. Loops within sequential logic are possible because the path propagation is being controlled by the clock trigger.

7) Avoid inferred latches in combinational logic
In always @(*), cover all branches (include an else or default) so outputs are defined for every input combination. Uncovered paths infer latches (usually a bug).
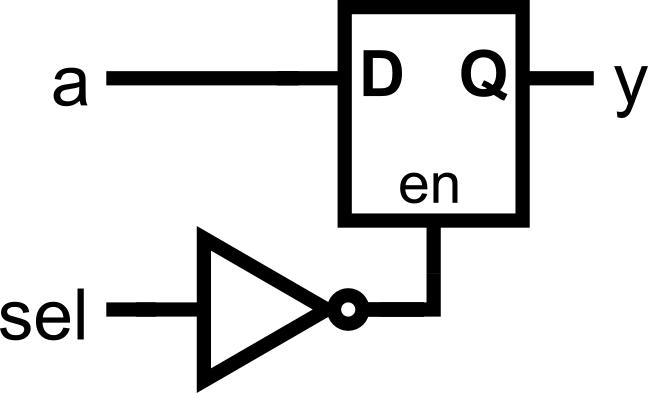
The fix: always cover all cases.
Or add a default in a case:
.png)
…but “holding value” is fine in sequential logic
In always @(posedge clk), omitting an else simply keeps the register value, which is often what you want:

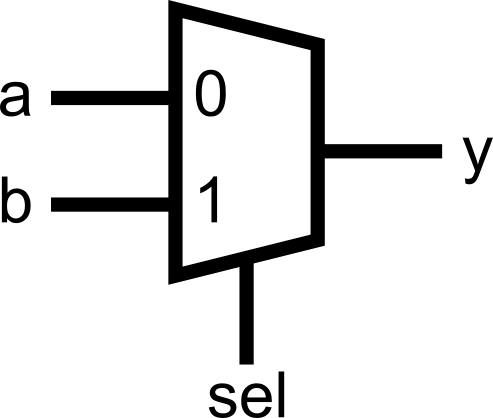
8) One driver per signal (no double drivers)
A net/register should be assigned in exactly one assign or one always block, not multiple places. Double drivers create conflicts and synthesis errors.
❌Bad:
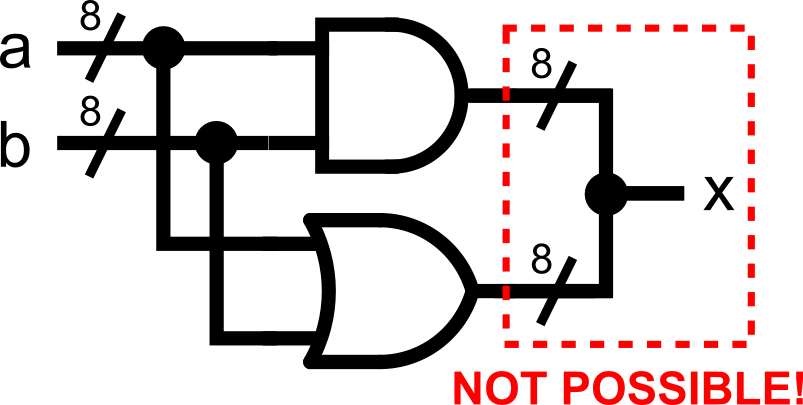
✅Good:
.png)
Always think about mutual exclusivity. All assignments to the same signal must always be mutually exclusive. At any given time, no two assignments to the same signal must take place. Use else to ensure mutual exclusivity.
9) Keep non-synthesizable constructs in the testbench
initial, #delay, $display, $finish, file I/O ($fopen, $fscanf, $feof, $fclose) are for simulation only. Use them in testbenches, not in the DUT.
Testbench snippet:
    initial begin
        // Initialize signals
        reset = 1;
        start = 0;

        // Hold reset for 20 ns before setting it to 0
        #20 reset = 0;

        start = 1;     // set start to 1
        #10 start = 0; // after 10 ns, set start to 0 (pulse start)

        // Display something
        $display("I was here");

        // Wait for 20ns more then finish simulation
        #20 $finish;
endThese are non-synthesizable constructs (i.e., no hardware equivalent).
- You can’t tell the hardware to delay an output at exactly x nanoseconds. Logic gates have delays due to their non-idealities, but you can’t specifically assign a delay for them.
- You can’t tell the hardware to print out messages (where is it going to print out anyway?).
- Hardware always runs. It is a circuit. You can’t just halt it.
10) Prefer localparam for states and special constants
Use descriptive names for states and key constants. This improves readability, minimizes errors when refactoring, and provides self-documenting code.
localparam IDLE = 2'b00,
COUNT = 2'b01,
SIGNAL = 2'b10;
localparam MAX_TICKS = 8'd200; // "special constant" now documented
localparam ZERO = 8'd0;
reg [1:0] state;
reg [7:0] ticks;
always @(posedge clk) begin
if (reset) begin
state <= IDLE;
ticks <= ZERO;
active <= 0;
timeout<= 0;
end else begin case (state)
IDLE: begin
ticks <= ZERO;
if (start) begin
active <= 1;
state <= COUNT;
end
end
COUNT: begin
ticks <= ticks + 1;
if (ticks == MAX_TICKS) begin
timeout <= 1; // one-cycle pulse
state <= SIGNAL;
end
end
SIGNAL: begin
active <= 0; timeout <= 0;
state <= IDLE;
end
endcase
end
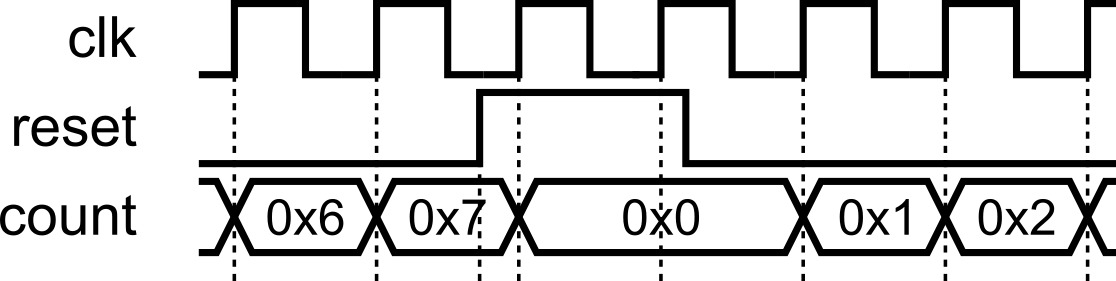
end11) Practical timing tip (when you see “one-cycle late” flags)
Staying in the single always @(posedge clk) style is fine. However, note that in sequential logic, registers only update after the clock edge. That means:
- On the rising edge of the clock, the
ifconditions check the old values. - The assignments (
<=) schedule updates, but those new values only appear after the clock edge has passed.
This often surprises beginners because it creates what looks like an “off-by-one” error.
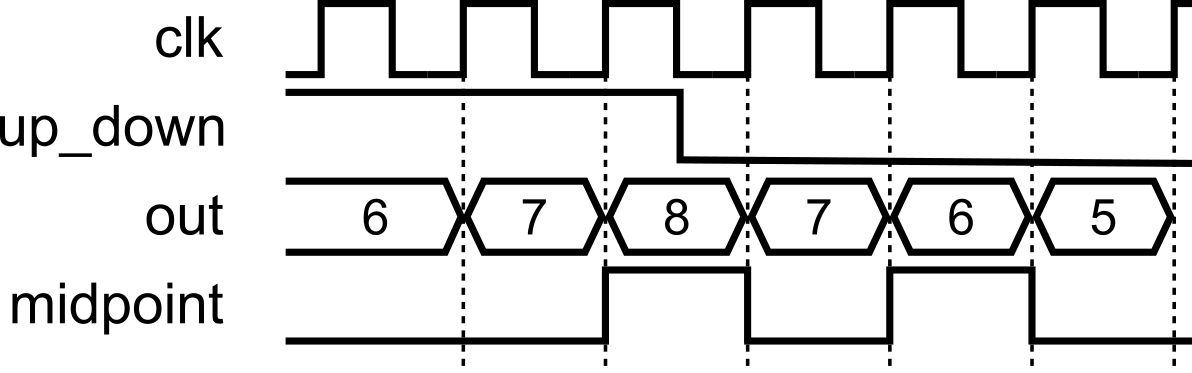
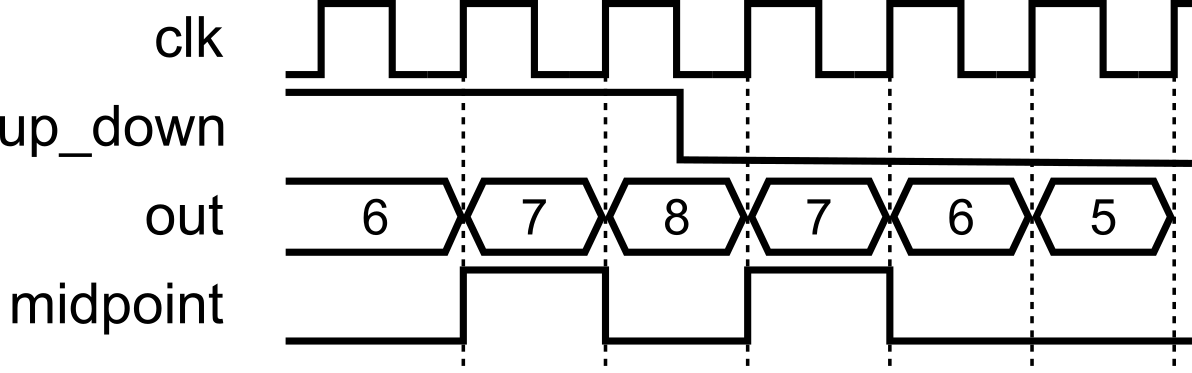
If a flag appears one cycle late (e.g., midpoint on a counter), fix it by:
Adjusting the condition to anticipate the next update (quick, inelegant), or
Deriving the flag combinationally from the registered value in a small
always @(*)/assign(cleaner).Use the second only when you need to correct an off-by-one or similar timing nuance; otherwise, keep your algorithm in one clocked block.
Fix A: Quick patch inside the clocked block:
Fix B: Cleaner (separate tiny combinational check just for the flag):
Use Fix B when the off-by-one would otherwise confuse readers or cascade timing surprises; it keeps the algorithm in one clocked block while correcting the observable timing of the flag.
Course Wrap-Up
✅Where you are now: you’ve built a solid, fast-prototyping path from an algorithm in your head to working Verilog. You can sketch steps, map them to states, write clean HDL, and verify it—quickly. Here’s what we covered so far (000–111) and what each piece unlocked for you.
- 000 — Basic Structure and Syntax You learned the shape of a Verilog design:
module … endmodule, ports, vectors, comments, and clean instantiation (by name/order). The focus: readable modules with legal, descriptive names. - 001 — Writing Combinational Logic You described logic with
assign, sized constants ('b,'d,'h), common operators, concatenation{}, and slices[hi:lo]. Big idea: concurrency—the order ofassigns doesn’t matter; hardware evaluates in parallel. - 010 — Advanced Combinational Logic You shifted to
always @(*)for richer logic, expressed choices withif/elseandcase, and learned two pitfalls to avoid: double drivers and inferred latches in combinational code (cover all branches or give defaults). - 011 — Writing Sequential Logic You moved time into the picture with
always @(posedge clk). The golden rule: use<=in clocked blocks (and=in@(*)). You built counters, added resets (top-priority), and internalized that all registers update together on a clock edge. - 100 — Advanced Sequential Logic Algorithms → FSMs: states as steps, one step per clock (the clocked block as an “infinite loop”). You named states with
localparam, handled transitions, and saw the one-cycle update nature of registers (condition checks use old values; updates land after the edge). - 101 — Testbench Basics and Verification You wrapped designs in a simulation harness: UUT instantiation, clock generation,
initialblocks, delays,$display/$finish, and wave dumps—testbench-only constructs that help you see and debug behavior. - 110 — Advanced Verification Ideas You leveled up to self-checking: reusable
task-based tests, multiple cases, and file-driven verification via$fopen/$fscanf/$feofpowered by a Python “golden model” to generate inputs/expected outputs—scalable verification without staring at waveforms. - 111 — Best Coding Practices (here) You collected guardrails for rapid, reliable prototyping: clear names, the golden assignment rule, reset priority, no combinational loops, no double drivers, no latches in combinational logic (but holding is fine in sequential), and keeping simulation tricks out of the DUT. Quick timing tip for “one-cycle-late” flags: either anticipate in the condition or derive a tiny combinational flag from a registered value.
Mindset to carry forward: think in steps (states), respect concurrency, size and name things explicitly, and let the clock be the timeline. Prototype fast, verify faster.
What’s Next: Extra Modules for Extra Learning
You’ve now got a fast path from algorithm → Verilog using a clean, single always @(posedge clk) style, plus the verification skills to prove it works. For learners who pass all assessments and want to architect larger, more complex systems, two optional modules are available. They introduce higher-level styles and syntax that trade simplicity for scalability. These are meant for advanced Verilog coders and are already beyond the original goal of this crash course.
Extra Module 00 — Structural Coding Style
Goal: Learn to scale designs by structuring them: separate concerns, give each register a single point of ownership, and make big datapaths readable and maintainable.
Mindset shift: Instead of one big sequential block, you’ll split logic by responsibility, typically giving each register its own clocked block (and optionally small local combinational helpers). This can make timing intent and dataflow crystal clear in large systems.
You’ll learn to:
- Give each register a dedicated
always @(posedge clk)that owns its updates. - Factor shared logic into tiny combinational helpers or
assigns to avoid double drivers. - Refactor monolithic FSMs/datapaths into structural, pipeline-friendly pieces.
Extra Module 01 — Advanced Verilog Constructs
Goal: Build confidence with higher-level syntax that speeds up regular structure: multi-dimensional arrays, for loops (for init/reset in sequential blocks), and generate constructs for clean replication and parameterization.
You’ll learn to:
- Declare and use multi-dimensional arrays (e.g., register files, tiled buffers).
- Use
forloops in clocked blocks to reset/initialize arrays (loop unrolls in hardware). - Use
generate/genvarto replicate modules or logic slices at scale. - Parameterize widths/depths for reusable components.
How do these extras fit your journey
- Your base course made you fast and correct for small/medium problems.
- These extras make you scalable and systematic for big ones: pipelines, wide datapaths, replicated structures, and configurable blocks.
- You’ll still lean on the fundamentals you’ve already mastered: clear ownership, concurrency awareness, explicit widths, and disciplined resets,just applied at a larger architectural scale.
When you’re ready (and have passed all assessments), unlock these modules to level up from “it works” to “it scales.”
X: Module Assessments
Each of the modules has corresponding assessments so you can test your understanding. The collection of assessments is presented below for easier access.
Module 000: Basic Structure and Syntax
This module’s activity is in this Jupyter Notebook.Line by line, you can execute the code in order to see how the environment works. I recommend pressing the Run allbutton at the top and giving it about 2 minutes to download all of the requirements. In the middle of the notebook, you’ll find a section where you need to fill in some verilog code. Time to show your stuff.
ALUs perform operations on inputs A and B, but you can choose which operation to perform by choosing the opcodeinput. Your task in this activity is to implement an ALU (Arithmetic Logic Unit) with structural instantiation of the existing modules.
Module 001: Writing Combinational Logic
This module’s activity is in this Jupyter Notebook.Line by line, you can execute the code in order to see how the environment works. I recommend pressing the Run allbutton at the top and giving it about 2 minutes to download all of the requirements. In the middle of the notebook, you’ll find a section where you need to fill in some verilog code. Time to show your stuff.
Like in the previous activity, we’ll be implementing an ALU. But this time, NONE OF THE MODULES ARE PROVIDED.Hence, you’ll have to write all the logic yourself using assign statements.
Good luck!
Module 010: Advanced Combinational Logic
This module’s activity is in this Jupyter Notebook.Line by line, you can execute the code in order to see how the environment works. I recommend pressing the Run allbutton at the top and giving it about 2 minutes to download all of the requirements. In the middle of the notebook, you’ll find a section where you need to fill in some verilog code. Time to show your stuff.
Again, we’re implementing an ALU. I promise this is the last time. However, we have another twist this time. This time, you will have to implement the ALU with the outputs defined as reg! The regstatement is, in fact, incompatible with assignstatements. Hence, you’ll have to use an always block.
Good luck!
Module 011: Writing Sequential Logic
This module’s activity is in this Jupyter Notebook.Line by line, you can execute the code in order to see how the environment works. I recommend pressing the Run allbutton at the top and giving it about 2 minutes to download all of the requirements. In the middle of the notebook, you’ll find a section where you need to fill in some verilog code. Time to show your stuff.
In programming, we usually take randomness for granted. It is simple to use programming libraries and packages to generate random numbers. However, under the hood, generating random numbers is really really difficult. Linear Feedback Shift Registers (LFSRs)allow hardware engineers to efficiently generate “random numbers”.
In this activity, your task is to implement a 4-bit Galois-type LFSR using the knowledge you’ve gained about writing sequential logic.
Module 100: Advanced Sequential Logic
This module’s activity is in this Jupyter Notebook.Line by line, you can execute the code in order to see how the environment works. I recommend pressing the Run allbutton at the top and giving it about 2 minutes to download all of the requirements. In the middle of the notebook, you’ll find a section where you need to fill in some verilog code. Time to show your stuff.
A stackis a programming data structure (or type of memory, really) where you can write data (called pushing to the top of the stack). When you read data (called a popping from the top of the stack), the data comes out in reverse order of how it came in. For tasks that need you to backtrack, like depth-first searches, or text-processing, the stack is useful. Implementing these algorithms in hardware can require the use of a stack-type memory.
In this activity, your task is to implement a stackusing advanced sequential logic. As a guide, remember to use a finite state machineto model the behavior of a stack before writing your code.
Module 101 & 110: Testbenching and Verification
In reality, we do not use Jupyter Notebooksto run Verilog simulations. Rather, Verilog simulations are typically done in integrated design environments. For this activity, open the Verilog Crash Course Github Repository. To start the design environment, click Code > Codespaces > Open in Codespace… The codespace will have a setup stage for about 10 minutes. However, at the end, you should see a coding-environment-like window.
From this window, you can write files, see waveforms, run arbitrary code and commands in the terminal, and other such things. This is how digital design engineers typically do their work.
In this activity, you’ll be
- Familiarizing yourself with using the terminal to run Verilog simulations
- Using a waveform viewer
- Writing a testbench and debugging verilog code
The rest of the instructions for this activity are written on the Github page itself (scroll down from there).